When you create a new bin change batch, Micronet displays the Create Bin Change Batch screen where you enter the main (header) details for the batch, including selecting the items to be included in the batch.
To access and maintain the bin change batch header details:
Refer to "Creating a New Bin Change Batch".
Refer to "Recalling a Bin Change Batch".
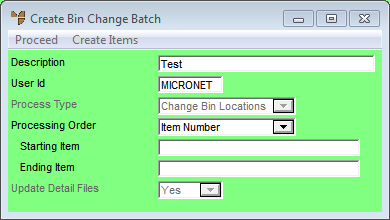
Micronet displays the Create Bin Change Batch screen.
|
|
Field |
Value |
|
|
Description |
Micronet displays the batch description. |
|
|
User Id |
Micronet displays the user ID of the person making these changes. |
|
|
Process Type |
Select the action you want to perform:
|
|
|
Processing Order |
Select the sequence in which items are to be processed – in either Item Number order or Bin Number order. |
|
|
Starting / Ending Item |
If you want to change bin locations for a range of items, enter the starting and ending item numbers. |
|
|

|
Technical Tip You must select an item range if you are deleting empty bins. Only empty bins in the batch (within the range) will be deleted. |
|
|
Update Detail Files |
Select the files in which the bin changes are to be updated. Options are:
|
Micronet scans the relevant files and compiles a list of items and locations based on your selection in the Processing Order, Starting Item and Ending Item fields.
Micronet redisplays the Change Bin Locations screen showing the items to be moved at the bottom of the screen.